Videos[]


Guide[]
OK, this time I'll try to explain how to make a bald human male character wearing leather jacket à la Mad Max from existing Fallout2 FRMs. Like this one:
![]()
TOOLS
A paint program, possibly one supporting work with layers (I've used Photoshop, but you don't have to)
Fallout Modification FAQ by dude_obj
CONCEPT
=[]
Well, first of all we need to know what FRMs should be edited and which new should be added.[1]
The best source for editing are hero male animations (FRMs) starting with HM. In this case we could use the animations of the male hero wearing black jacket (HMMAXX**.FRM files). For more info about the FRM naming index, consult the Fallout Modification FAQ.
You'll also need the animations of the bald guy (NMLTHR** files), so we can chop his head off and stick it on the leather jacket body.
Your new bald character's gonna need all default walk/run/actions/death animations, and some weapons animations, but it's up to you to decide which of those. Example: if you want to make Cassidys' replica in leather armor, you'll have to add spear, pistol and rifle animations on the top of it.
Copy all of the FRMs you want to edit to the work directory and to another one, backup directory - just in case.
WARNING: This job requires a lot of free time and skill. Well, maybe patience too. Just to let you know before you start with it.
HOW TO DO IT
=[]
1. Copy FRM you want to edit to your work directory and open it using FRM animator (I'll work with HMMAXXAA.FRM)
2. Go to "File->Save Project As" and click "Save". Now all frames have been saved as BMP, and there is the FPR file containing all the info about the animation.
3. Repeat the first two steps for your bald FRM (I'll work with NMLTHRAA.FRM). Once you're finished with it, you can close the FRMAnimator.
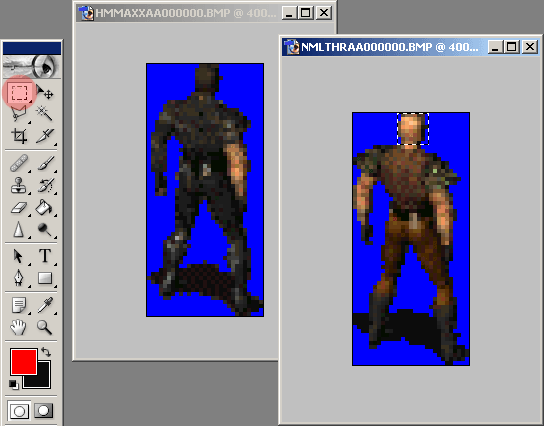
4. Start your paint (Photoshop or other) program. Load first frame of your leather jacket animation (for me it's HMMAXXAA000000.BMP) and the first frame of the bald guy animation (for me it's NMLTHRAA000000.BMP)
5. Select the bald head, then deselect background pixels (Magic Wand tool in Photoshop will do the job, use it in combination with ALT to deselect), like this:
6. Copy the head (CTRL+C) and paste it to the leather jacket body (CTRL+V), then use Move tool to adjust it, like this:
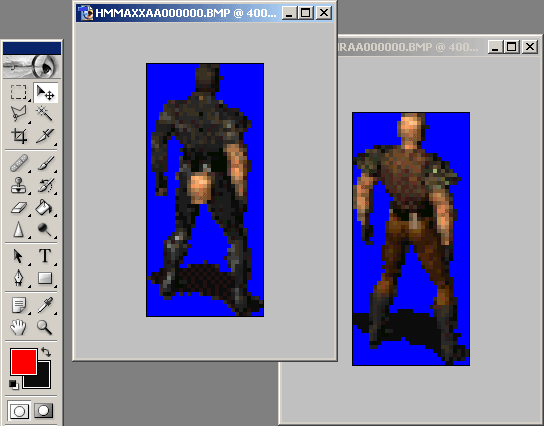
7. Flatten the image (merge the layers or whatever else is needed), in Photoshop you can do this using "Layer->Flatten Image" option. Save the file!
8. Repeat the steps 4, 5, 6, and 7 for all other frames (BMPs), frame by frame
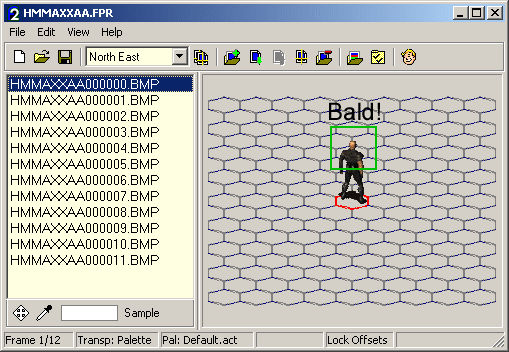
9. Start the FRMAnimator utility and load your leather jacket project (in my case it's HMMAXXAA.FPR). The program will automatically load edited frames (BMPs) and put them in the right place. Like this (I've changed one frame only, the first one):
10. Create FRM from your project ("File->Create FRM"). In this case the name will be HMMAXXAA.FRM
WARNING: Most of the animations are in FRM format. However, some death animations are in FR0 - FR5 format.
FR0=north-east
FR1=east
...
FR5=north-west animations directions.
Be sure to save the file in the correct format!
11. Repeat steps 1-10 for other animations.
That's it. I'm available for any questions, feedbacks, flaming etc.
by Lisac2k.