Introduction[]
This tutorial will cover how to configure multiple mods so that more than one can be installed at the same time without effecting each other. Each mod can be run from its own shortcut in the start menu and will have their own set up savegames and settings. Each mod is completely independent from the other mods and will not affect the default install of Fallout 2.
This also means that you no longer have to remove the patch000.dat from the Fallout 2 folder, in fact you should leave it there as you still play the original vanilla version of Fallout 2.
Step 1[]
The only requirements for this mod is Timeslip's Sfall program and any other requirements that each mod may have.
Sfall requires that you have the latest US version of the fallout2.exe which is 1.02, so remember to patch your game first, you can even leave the patch000.dat file there as Sfall will bypass it.
Step 2[]
Once you have downloaded Sfall, copy both ddraw.dll and ddraw.ini into your Fallout 2 folder. Then, open ddraw.ini with a text editor and change the value for 'UseCommandLine' from 0 to 1. This will turn on the ability to run the Fallout2.exe with command line options.
eg: UseCommandLine=1
Step 3[]
Now for each mod that you have installed create a copy of the ddraw.ini file and rename it to match the mod name. Some mods already come with their own version of the ddraw.ini, in these cases just rename this to the mods name.
ddraw.ini = modname.ini
Step 4[]
Now that each mod has its own custom ddraw.ini (modname.ini), this file needs to be edited. Open the file with notepad and edit the following values, be sure to remove the semi colon ';' from in front of the value to enable this option.
ConfigFile=modname.cfg (default value is fallout2.cfg)
PatchFile=patchname.dat (this only needs to be set if the mod is packaged as a Dat file)
Step 5[]
The next step is to go into the Fallout 2 folder and copy the fallout2.cfg file and rename the copy to be modname.cfg. The file name must match what you entered in the previous step. Each mod will need its own cfg file.
Step 6[]
Each mod should now have its own version of the cfg file. Open up the modname.cfg file with notepad and edit the following values:
critter_patches=C:\Program Files\BlackIsle\Fallout2\modname (just change 'data' to 'modname')
master_patches=C:\Program Files\BlackIsle\Fallout2\modname (just change 'data' to 'modname')
This now means that each mod has its own location to put save games and other settings. At this point in time if the mod you are installing did not come packaged as dat file but instead as a data folder you will need to rename the mods 'data' folder to be 'modname' and place it into the fallout 2 folder. If the mod is a dat file make sure the dat file is renamed to 'modname.dat' and place it into the Fallout 2 folder.
Step 7[]
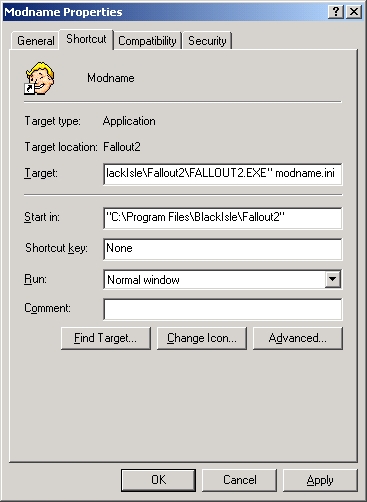
The last step is to just create a shortcut to the fallout2.exe for each of the mods you have installed. Once you have created the shortcuts you need to edit them and add 'modname.ini at the end of the 'target' field.
Step 8[]
You should end up with a Fallout 2 folder looking something like this:
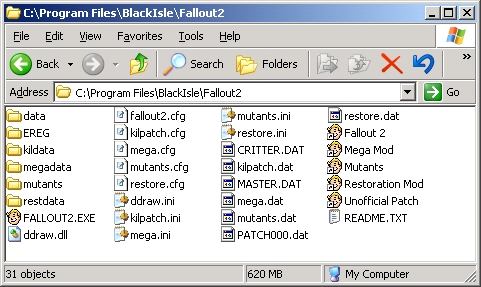
Now you just need to double click on the shortcut to run the desired mod. Normally, move the shortcut to a more logical location such as the start menu or desktop.
NOTE: While the above tutorial is a somewhat manual process, if modders start using an application installer to install their mods on players computers this process can be automated as far as the end user is concerned. While the modder will need to make a copy of the ddraw.ini for their mod an installer program can make a copy of the fallout2.cfg and edit it to point to the mod. The installer will also be able to create all the shortcuts.
I would recommend Inno Setup
A good gui pluggin is ISTool
Author[]
Wild_Qwerty - Mutants Rising Team Breakin'Benny correcting and updating information