Introduction[]
This is a basic tutorial on how to make a new FRM for a critter in Fallout 2. Though this tutorial will explain the steps in taking a new critter from Fallout Tactics a lot will apply to creating new FRMs for critters in general. Requirements A suitable *.Spr file from Fallout Tactics, in this case we will use "environmental.spr" Spr2Frm (Includes Spr2Gif, Gif2Fr, and FrmCat) Frame Animator 2.51 Frame Animator Scripts RenFRM.bat
Step 1 - Making the raw FRMs[]
Ok in this step you will actually make the new FRMs, though these are only a 'raw' FRM as they still need to be tidied up or they just look nasty.
Copy environmental.spr into the same folder as Spr2Frm and from command prompt type the following (note: without the *.Spr file extension):
Spr2Frm environmental
Sit back and enjoy the show, this could take a while on some computers. Once the conversion is completed proceed to the next step.
Step 2 - Aligning the new FRMs[]
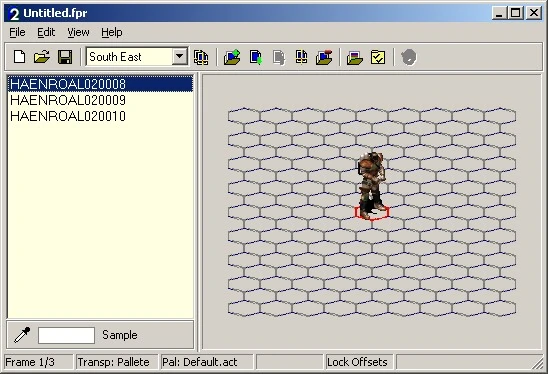
Now to adjust the alignment for all the FRMs, dont worry its not as bad as it sounds, you only have to make sure that the primary FRM is centered correctly and the engine automaticaly aligns the rest to this one. The primary FRM is the one that is named xxxxxxAA.FRM but at the moment it is called either StandBreath or StandFidget if it is available, the good thing about the FO2 engine is that is automaticly looks at the image in the FRM and lines them all up so that the feet are in the same place as the primary FRM. Open Frame Animator Select 'File' and 'Open', and select the first FRM Select 'View' and 'Hexes'
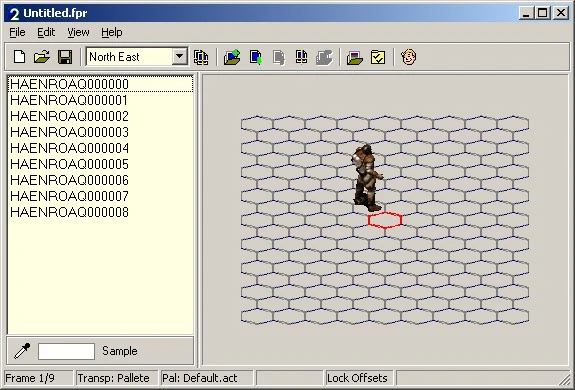
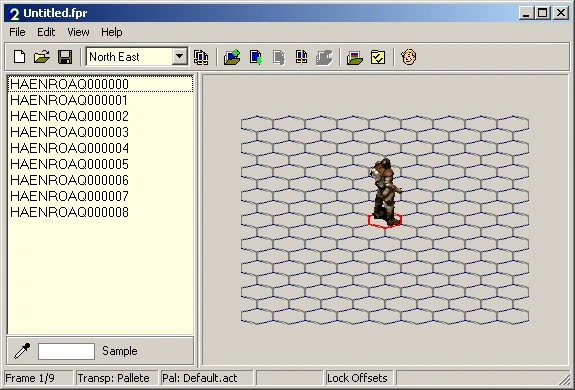
You may have noticed how the critters feet are not centred in the hex correctly; you will need to adjust the 'Frames Offset' (note the 's' do not adjust the Frame Offset yet). You can do this by clicking the 'Frames Offset' button or by dragging the image with the mouse. You should end up with something like this:
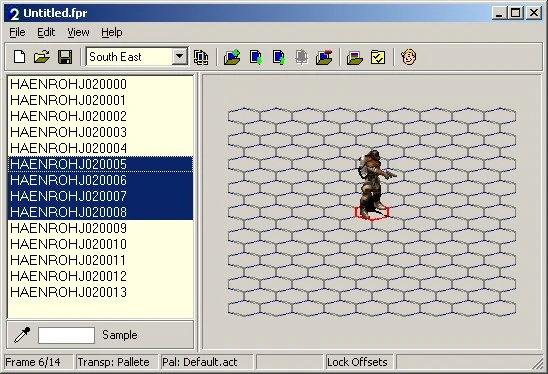
You will now need to repeat this for all six different orientations (North East, East, South East, South West, West, & North West), to save you will need to click the 'Create FRM' button. You may also have noticed that you when save the file it gives you the option to save as separate FRMs for each orientation, I think that this is to improve the loading time of larger FRMs such as death sequences. I left them all as FRM rather than FR0,FR1,FR2,FR3,FR4,FR5 files.
This is due to Spr2Gif centring each orientation on a different point. It's not really a big problem anyway as you only have to adjust one or two FRMs, depending on what one you use, but if the critter has a FRM called StandFidgit you should use it instead as they usally look better.
Step 3 - Walking, Running & Climbing[]
Now the FRMs that 'walk' and 'run' require some special treatment before they will work, in fact if you do not adjust the individual Frame Offset for each frame the critters feet will just slide in the original hex when it tries to move, in fact it does it indefinitely (I had to hit the reset button on my computer to get out). Thanks to Jochua adding 'automate' and scripting support this is now super easy (previously for each frame of the critter you will need to adjust the Frame Offset for each 'step' the critter takes in a given direction, this also had to be repeated for each of the orientations)
Open Frame Animator Select 'File' and 'Automate...'
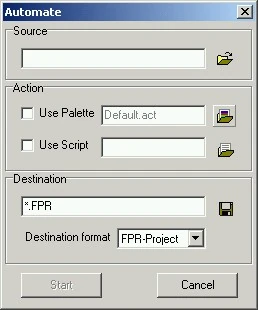
In the 'Source' box select the desired movement FRMs Tick the 'Script' check box Browse to the desired script (eg: 'Walking 11' for a walking animation containing 11 frames) Set the 'Destination' folder Set the 'Destination Format' to 'FRM'
Click 'Start'
This will automacticaly set the movement for all the FRMs that were selected. You will need to run a different script for each of the following movement types:
Walking FRMs - These are the main movement type, and is required for each weapon type. Running FRMs - These travel double the distance and the FPS is set to 18 Climbing FRMs - These move -2 Y for each frame, but for these FRMs it doesnt really matter
note: These scritps will only work on FRMs where the individual frames within a given FRM are the same size or are aligned while the offset is set to '0', hence do not run the 'Autocutting' feature until after running these scripts.
Step 4 - set the action frame[]
There is an a Hex offset within a FRM file that signifies when to launch an attack or use an item. By default this value is zero in a newly created FRM, which in turn makes the critters attack at the beginning of its animation rather than in the middle or when ever it should happen to be. In the animation below the critter would make the attack roll on the 1st frame instead of when its arm is extended on the 5th frame.

This value is set in Frame Animator by selecting "Edit" "Options" "Action Frame" and entering the frame number for which the action takes place. Please note that Frame Animator starts counting at 0, not 1. So the first frame is frame zero and the second is frame one etc...
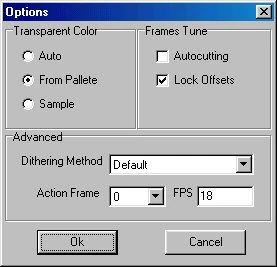
Once again repeat this for all the attack FRMs, though for now only do the HtH and Melee attacks we will come back to the guns a bit later, as you will need to edit them a bit first. Please dont adjust the FPS (frames per second) yet as you only need to change this for the running frames (new new scripts should take care of that).
Step 5 - Creating the missing FRMs[]
There are a few FRMs that you will need to create, as they are either not included as separate animations or not included at all in FOT. Here is a list of the FRMs you will need to make/edit. Without these FRMs you wont be able change weapons or fire the guns.
Equip weapon - xC - (made from 'StandMagichigh' or 'default' FRM) Unequip weapon - xD - (made from 'StandMagichigh' or 'default' FRM)
Aim gun - xH - (made from 'StandAtackGun' FRM) Lower gun - xI - (made from 'StandAtackGun' FRM) Fire gun, Single - xJ - (made from 'StandAtackGunSingle' FRM) Fire gun, Burst - xK - (made from 'StandAtackGunBurst' FRM) Fire gun, Flame - xL - (made from 'StandAtackGunSingle' FRM) - only needed if critter requires Flame Thrower
For the Equiping FRMs I just edited the standard 'StandMagichigh' FRM and saved it as "Equip.FRM". To edit it just delete all but the middle three frames and save it as "Equip.FRM" (the rename batch file will use this name so please do save it as this filename). This will provide a quick 'movement' to give the impression of changing guns. Or you can just use the 'default' FRM if you want a quick transition.
Unfortunately FOT does not include the animation for the equip sequences, using the above method works fine, but the gun just appears in the FRMs hands. More noticable is the fact the new weapons FRM will be centered in a slightly different location due to the size difference between the no gun animation critter and the critter with a gun, this is more noticable on larger guns such as the mini-gun. If you want to get around this you can make a smoother transition by adding frames from the desired weapon transition to the 'default.frm' file and then making sure that the frames are correctly centered, this will then ensure that the critter does not 'hop' during weapon transitions. This is very time consuming so I didnt bother.
To delete frames, select the unwanted frames and click the 'Delete Frames' button, or you can load the desired script which will delete a particular group of frames for you. eg : "6 Up.fas" will delete all the frame from 6 upwards. When using the scripts I find it easier to delete the last frames first.
Now for the aim, lower & fire gun FRMs just open up the StandAtackGunname.frm and save the first segment where the critter aims his gun StandAtackGunnameH.frm, and where the critter lowers its gun StandAtackGunnameI.frm and where the critter fires its gun StandAtackGunnameJ.frm For each of these FRMs you will need to delete the unneeded frames. Also for guns that have both a single shot and a burst mode you only need to make one set of aim and lower animations. You should also notice that most of the FRMs tend to have a transition point where there are two identical frames in a row this is where you should split the animation, but not all of the FRMs will have this so just use your best judgement. Once you have done this you will need to select the action frame for the StandAttackgunJ.frm
Step 6 - Renaming your FRMs[]
Now you need to rename the files into a standard that Fallout 2 will recognise, luckily I have also made a small batch file that will do this for you. Of course it will actually double up some of the FRMs as for example all of the different weapon poses will use the same 'recoil' animation but they each require their own file even though it is the same one (I copied StandRecoil.frm for each of the other recoil animations).
Anyway just copy RenFrm into the same folder as your new FRMs and run it from the command line using the following naming convention.
Please note that the 'XX' suffix should use the following convention.
HA = Hero Androgneus HF = Hero Female HM = Hero Male NA = NPC Androgneus NF = NPC Female NM = NPC Male MA = Monster Androgynous
The 'name' should only be a 4 character long abbrevation, in order to maintain the correct fallout2 naming convention (it wont work otherwise).
Once you have decided on its name run Renfrm using hte following syntax:
RenFrm XXname
And wa-la hey-presto you're done! Just copy the completed FRMs into the \data\art\critters folder update the *.lst file and you can now create a new proto for the critter within the editor!
Author[]
Wild_Qwerty - Mutants Rising Team